Motherboard BIOS Settings for ASUS Z270-A and Z270-P
Hi, I am Ben, aka thisismyback, and I’ll be providing new content at Block Operations. Rolf began nudging me towards the crypto space a couple years ago. I finally took action in early 2017 and it’s been a terrific learning experience ever since. Rolf has done an amazing job educating the masses about crypto mining through his videos and posts on Block Ops. As one of his mentees, it’s an honor to be a new contributor to Block Operations.
Me: The Quick and Dirty
I grew up in a house full of computers. My Dad built our first in 1979. Twenty some odd years later, I put together my own custom PC, so the basics of building a rig was not a foreign concept. My professional background is in IT Hardware wholesale and trading. From that experience, I’ve gained a decent understanding about enterprise level equipment, network infrastructure, etc. I’m currently running a small mining operation at home with 14 miners, both GPU and Asic, with a goal to reach 50 by June. Mining is both rewarding and frustrating. I’ve left my comfort zone and learned concepts that were completely foreign to me a year ago. There have been late night howls of frustration and a strong desire to take out a monitor or two. Through it all I’ve found these experiences to be invigorating.

A few quick side notes:
- I love a good gif (and I pronounce it like gift but drop the T, it’s not a jar of peanut butter)
- I love visual content, videos and/or screenshots
- I hate lists
Explain Like I’m 5
ELI5 will be central theme of my content. Simple and concise. Most of the mining content available out there makes a lot of basic assumptions, after all, most of the early adopters likely had an IT background of some sort. The explosive growth of crypto currencies has brought a new audience that lacks the technical savviness of their predecessors. Sometimes, we need to explain ideas/concepts in simple terms.
Specifically, I’ll be covering the issues that challenged me, addressing questions that seemingly lacked answers and answers that frankly, could have been better explained. Even the most rudimentary coding aspects, like learning the basics of Linux through a program like ethOS was daunting for me. Let’s face it, for the average Joe, leaving the confines of our nice, comfy gui interfaces like Windows or OS, is intimidating. Hopefully, my shared experiences will help you wade through.
Okay, now that we’ve gotten the intro out of the way let’s tackle today’s subject – motherboard bios settings. Specifically in regards to the ASUS Z270-A and Z270-P. I’ve used these boards exclusively in 4 of my 5 builds with a BioStar TB250-BTC being the other. A mining buddy mentioned how tedious the ASUS boards were, especially in comparison to the TB250-BTC. While there are additional steps, it’s fairly easy to work through them once you are familiar with the process.
The Process
Please note the steps below are for the Z270-A but you can follow the same steps for the Z270-P, I’ll point out any exceptions below. If you are planning to only run 6 GPU rigs, go with the Z270-P, which typically costs $100-115. The Z270-A will allow you to mine up to 8 GPUs, 7 PCIe slots and an adapter for the M2_2 slot will allow for the 8th. This board runs around $150-160.
Let’s roll.
When the rig boots, press the DEL or F2 key to get into the MB bios. I rapidly alternate between the two in a manic fashion. It’s unnecessary but it’s fun.
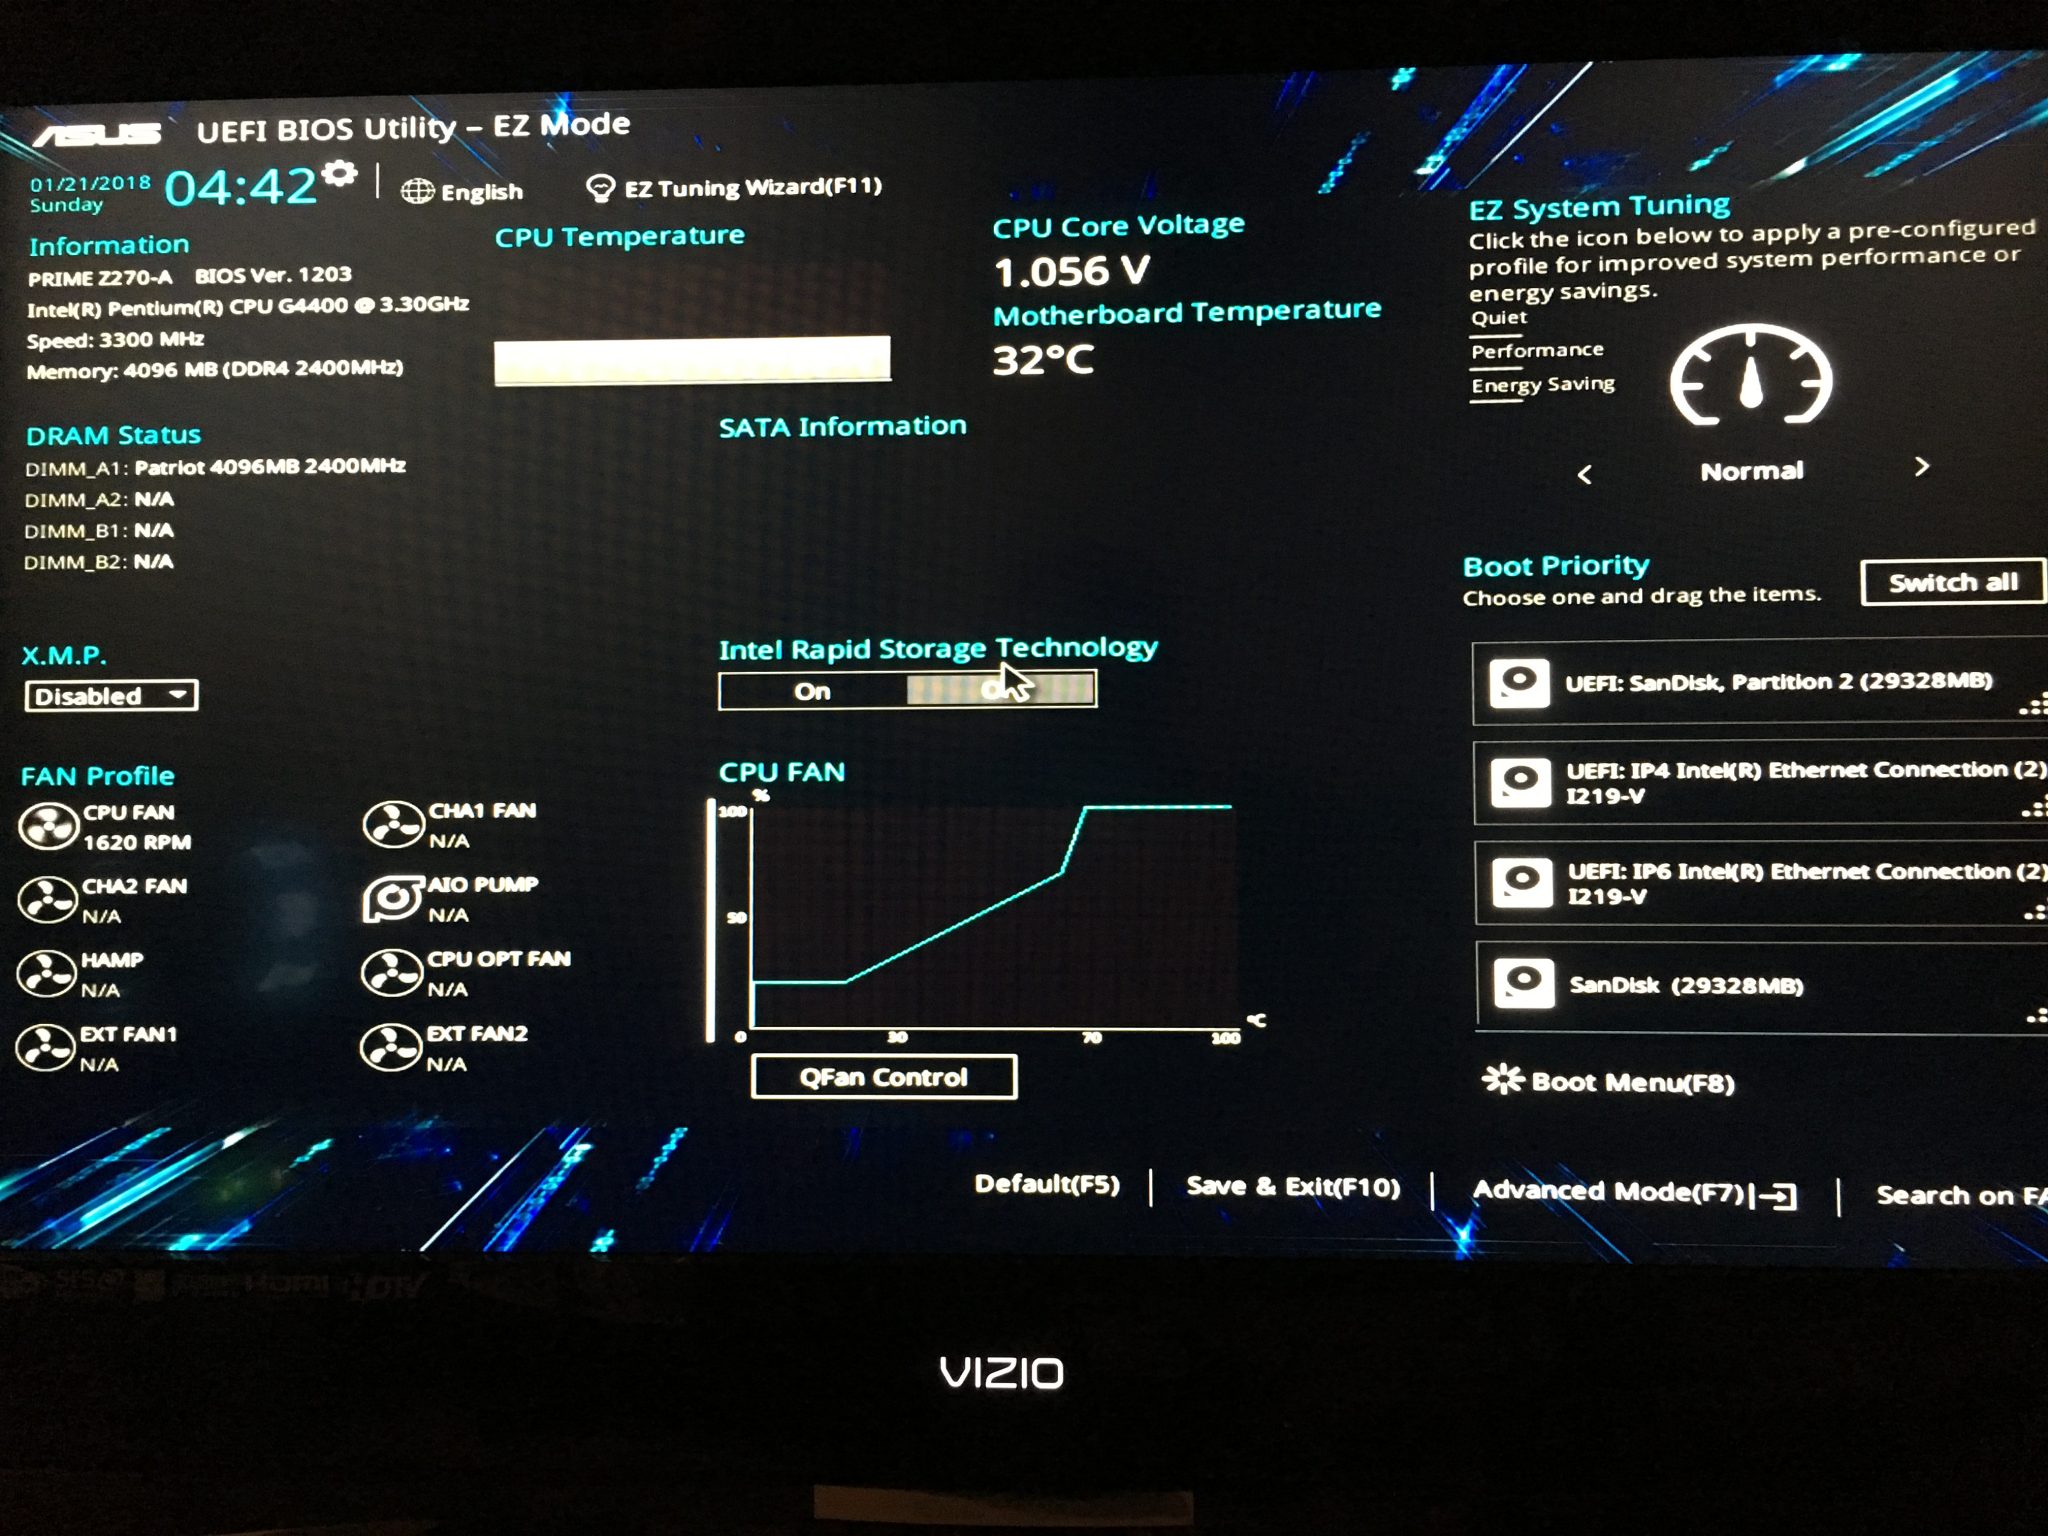
You’ll find yourself here, the main landing page:
Image 1.

You can use the mouse or key board through out these steps. I prefer to use the key board as the tab and arrow keys are much quicker.
From the landing page, press F7. This is the ‘Advanced Mode’ menu and where we’ll be doing our modifications:
Image 2.

Scroll with the right arrow key until you reach the “Tool” menu item. We’re going to select ‘ASUS EZ Flash 3 Utility’:
Image 3.

Make sure your motherboard is connected to the internet or else the rest of this will be pointless. We’re going to check for updates through the Internet. Use the arrow keys or tab to select Internet:
Image 4.

Click or tab to Next and hit enter. The system will now reboot and bring you back to the same page. Select Internet again. Select DHCP, then next and enter:
Image 5.

At this point you will either be provided a new update (I’ve only come across one that required an update) to download or it may be current. An update can take a few minutes to download, install and reboot. Once done, just return to the main landing page and hit F7 to return to ‘Advanced Mode’.
Select ‘Advanced’ from the menu list, you’ll see a long list of options to modify. Here we’ll be tweaking quite a few things.
Image 6.

Use the down arrow key to select ‘System Agent (SA) Configuration’, hit enter. We’re going to be editing the settings in the Graphics, OPI, and PEG Configurations.
Image 7.

**For Z270-P boards you will be making two mods specific to that board here in System Agent Config.**
Change Above 4G Decoding to Enabled
Change Primary Display under Graphics Configuration to CPU Graphics
Next select ‘DMI/OPI Configuration’. We’re going to change the DMI Max Link Speed to Gen2.
Image. 8
Return to the ‘SA Config’ menu. Arrow key down to PEG Port Configuration and hit enter. We’re going to modify the PCIEX16_1 Link Speed (for both Z270-A & Z270-P) to Gen2. We will do the same for the PCIEX16_2 Link Speed for the Z270-A boards.
Image 9.
All right, let’s return to the ‘Advanced’ menu.
Image 10.

Now we’re going to update the ‘PCH Configuration’, arrow key down and hit enter.
Image 11.
Enter the ‘PCI Express Configuration’ sub menu. We’ve got another Gen2 update to select, this time changing the PCIe Speed to Gen2.
Image 12.
Return to the ‘Advanced’ menu and now we’re going to modify the ‘Onboard Devices Configuration’. We’re going to make some additional Gen2 changes as well as disable some settings we don’t need.
Disable the HD Audio Controller
Image 13.
We need to change the M.2_1 Configuration to PCIe Mode so that the MB recognizes the 7th GPU. The Z270-A also has an M.2_2 Configuration with the X2 and X4 option. This, in conjunction with an adapter, allows you to add an 8th GPU but I’ve not experimented with it yet. If you have, please share in the comments.
Image 14.
Last thing to edit here is the ‘Serial Port 1 Configuration’. We want to turn that OFF.
Image 15.
Take it back to the ‘Advanced’ menu and we’re going to tweak the ‘APM Configuration’. This is a key modification here, we’re going to edit the settings of ‘Restore AC Power Loss’ to Power ON. This will automatically reboot the rig if there is a power loss.
Image 16.
Our final modifications will take us to the ‘Boot’ menu within the ‘Advanced Options’ main menu. Once we enter the ‘Boot’ sub menu, we’re going to Disable ‘Fast Boot’.
Image 17.
And last but not least, we’ll change the settings of Above 4G Decoding to Enabled. *This is only for the Z270-A as it’s located in a different sub menu on the Z270-P*
Image 18.
Time to save our changes, select the ‘Exit’ sub menu. Select ‘Save Changes & Reset’. It will provide a summary of all the changes made and select OK, hit enter. I originally forgot to screen shot my original work but had to go back for another edit so snagged this one.
Image 19.
That’s it! I promise after you do that a couple of times, the process will quicken. Keep an eye out for more content in the future. I’m working on both short and long form video content, I’m currently trying to solve some air circulation issues in my basement. If you have any suggestions or feedback please comment below. You can reach me via email at mintbitmining@nullgmail.com.
Cheers!


February 15, 2018 @ 3:38 pm
Ben, thanks for the article. You mention that you’ve also used the TB250-BTC, which for me has been a very stable and basically plug and play-type of board. Is there a reason you prefer the ASUS Z270-A/P boards?
February 16, 2018 @ 11:38 pm
Thanks for reading. I think it’s just a comfort issue. There were issues with the rig I built for the TB250 and it kind of left a bad taste in my mouth. The idea for the article came from a friend who shared the same experiences as you. He kind of looked at me like I had two heads when I told him I preferred the ASUS boards, so I figured it would be beneficial to share. I am planning builds with the TB250s to get out of my comfort zone!
March 9, 2018 @ 6:49 am
Hey Ben, I used both M.2 slots and have 9ea. 1080’s running nicehash on widows at the moment. I had to manually set my virtual memory to about 48,000 max to get it to stop having memory allocation errors. I see a lot of people recommend setting it to 30,000 but I think that’s only for 6 card miners.
Looking forward to your ELI5 version of Ehos.
June 25, 2018 @ 6:21 pm
Hey, I see a lot of similarities in my Asus H97Plus motherboard BIOS. Ofc it’s older but still has 2 PCIe and it’s enough for me for the moment. My question is: can I operate and try to build my own rig with a H97Plus MB like mine?
I can’t find any specifics for mining config for this MB, so im a bit confused about the Gen2 setting because I’ve seen some saying to set it on Gen1 (GPU damage risk?)
November 3, 2018 @ 2:55 am
I could hug you
May 27, 2021 @ 7:55 am
I agree! This saved me from throwing this motherboard in the garbage with the constant keyboard not detected error on startup. Still no idea what setting fixed this
November 8, 2018 @ 2:26 pm
This works for Z270E as well. Just follow instructions for 270A. Following these instructions was the only way I could get HiveOS stable. Thanks for the info.
December 10, 2018 @ 1:32 am
Ciao ti scrivo dal l’Italia la mia città è Napoli. Ho comprato una scheda madre asus z270-K ti non so se vuoi aiutarmi io non sono un esperto dei compiuter.dicevo ho comprato un asus z270-K il mio processore Intel I5 7500 la scheda grafica è nvidia GeForce oh-gtx 1050ti-4g. Ho visto nelle illustrazione in maniera chiara come installare un BIOS.ti chiedo allo stesso modo se lo puoi farlo per me.grazie e scusami
December 11, 2018 @ 11:32 pm
If anyone using this board installs SQRL Acorns, be sure to change the Onboard Device > m.2_2 settings to X4
May 1, 2019 @ 9:17 am
I also exclusively use the AsusTek z270 Mobo line; I have six z270-a, two z270-ar, and two z270-p and run 8 GPU’s on all of them. If using Window 10 / Pro, some coins will require a much larger virtual page size; I run 48,000 min – 64,000 max, especially for the algos of the newer Gen 3 coins. It is a very stable mid teir board with alot of goodie. I used to set all the same settings to Gen 2, but later found that there is no real difference in performance or stability if you leave them in Auto, the same goes for the M2 Pcie adapter slot, it can also stay in Auto. Also, this board has more onboard 4 pin fan plugs that most other boards; one thing you also should do it run the Auto fan optimizer. It also allows you a wide choice of CPU’s, I have ran both Sky and Kaby lakes, and if doing on the cheap, it is much better to go with a GS4600 which has hyper threading, instead of the GS3900 or GS3950. Which I have been changing over to i5-7600k cpu’s for coins like Grin or Beam that need more than a 2 core processor. I also turned the HD Audio back on, since I get these cheap 19″ HD TV off craigslist for between $10 – $20 bucks, this way if working around the rig I can play spotify or watch a YouTube video. I have been running four of these boards since July of 2017 and still no issue’s, and still pick them up for $15 buck of ebay. I use the same board in my gamming rig with an i7-7700k .. it’s just any all around good board, which is a good thing because Asus Customer Support is horrible.
October 30, 2020 @ 9:58 am
Hi Ben, I have got a new pc with a Asus H410 motherboard (Windows not installed). I have Windows 10 on a USB. Would you mind explaining how to install it?
February 23, 2021 @ 2:23 pm
Thank you. You helped me so much. I was putting more than 4 cards, and was getting white led – VGA error. After your suggestions everything works well.
June 22, 2021 @ 8:39 pm
I can’t get the 8th card to load for the life of me
February 14, 2022 @ 1:37 pm
thank you for the article! i had problem adding 4th card.
so enabling secure boot did not change anything but
Change Above 4G Decoding to Enabled
helped me.
thank you very much.